3. The M4 Express#
The Adafruit Feather M4 Express is a microcontroller that provides sufficient resources and computing power to create pedagogically meaningful scientific instrumentation. It can be programmed using either C++ or Python, and this text will use the latter - specifically CircuitPython - for all projects.
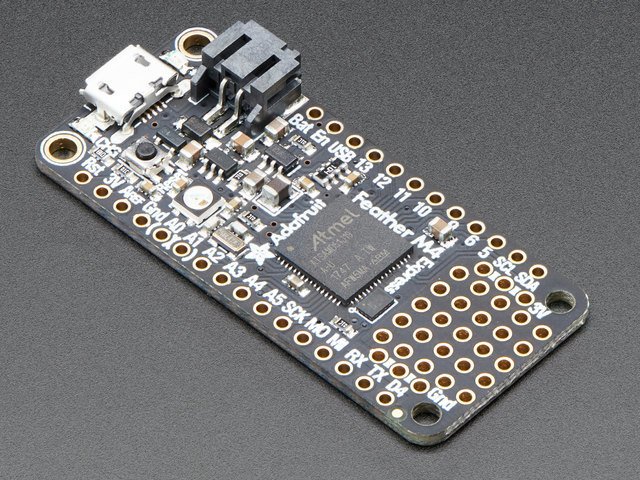
Fig. 3.1 The Adafruit Feather M4 Express (courtesy of Adafruit)#
For more extensive details on how to use CircuitPython with M4 express, visit Adafruit’s web page. Here you will find a summary of information that is necessary to get up and running.
3.1. The Bootloader#
All computer and computer-like devices require an operating system, and the software that loads this operating system into memory is called the bootloader. For microcontrollers such as the M4 Express, the bootloader controls what type of programming language can be used for the device. Due to the ease and accessibility, we use the UF2 bootloader, which allows the microcontroller to understand CircuitPython instructions and also makes updating the code extremely simple.
To install the latest bootloader, you must first download the most recent stable version. Next, with the M4 Express connected to your computer with a USB cable, you will double-click the reset button. At that point, a new drive (FEATHERBOOT) will appear on your computer. If no new drive appears at this point, double check the USB connection and ensure the USB cable is for both power and data. Drag the .uf2 file you downloaded previously to this drive, which will case the red LED on the board to flicker and the FEATHERBOOT drive will disappear. A new drive, CIRCUITPY should appear, indicating that you have successfully updated the bootloader.
3.2. Programming with Mu#
CircuitPython programs can be generated with any software that can generate text files; however, it is convenient to use a program designed for writing such code. Mu is a simple program that provides everything needed for this course and is available for Windows, MacOS and Linux. One of the advantages of Mu is that updating the software on the microcontroller is as simple as pressing the save button in the Mu software. No additional task is needed. Additionally, Mu (as well as other IDEs or Integrated Develop Environments) provides a tool for viewing output from the microcontroller using a serial console.
4. Circuit Python#
Note
Ensure that you are using at least version 6.3.0 of Circuit Python. You can find this information in the boot_log.txt file located on the CIRCUITPY drive
With the latest version of CircuitPython installed on the M4 Express and Mu up and running, it is time to start programming the microcontroller. Type the following code into the Mu editor:
import board
import digitalio
import time

led = digitalio.DigitalInOut(board.LED)
led.direction = digitalio.Direction.OUTPUT

while True:
    led.value = True
    time.sleep(0.5)
    led.value = False
    time.sleep(0.5)
Some things to note about python code:
commands are case sensitive which means True and true are two different things.
spacing is important. Note that the code under the while True: line has been indented. The size of the indent isn’t important; however the fact that all subsequent lines are indented the same amount is important.
Once the above code is saved in a file named code.py, you will notice that a red LED begins to blink regularly on the M4. Let’s break down the code to see what was done.
import board
import digitalio
import time
These three lines import modules into memory. Modules contain pre-written code that is intended to be reused. In this case, board contains useful information like the location of the red LED. digitalio contains information about controlling the digital inputs and outputs and time contains the sleep function, which allows a programmer to insert delays in the code.
Note
Look at the remaining code and identify where these modules are used. You can tell they are used because the module names will precede a period.
led = digitalio.DigitalInOut(board.LED)
led.direction = digitalio.Direction.OUTPUT
The first line highlighted here creates a variable called led that instructs the program communicate with the output connected to the red LED using digital signaling. The second line indicates that digital signaling will be output from the microcontroller.
while True:
    led.value = True
    time.sleep(0.5)
    led.value = False
    time.sleep(0.5)
The remaining 5 lines contain the bulk of the program. First a loop is established; the command while True: is one way to tell python to keep performing the subsequent tasks indefinitely. The indentation identifies which commands should be performed during this loop. The next line, led.value = True turns on the LED. The subsequent lines tell python to do nothing for 0.5 seconds, turn off the LED, and wait another half second before repeating the loop.
Some things to try:
Adjust the delays so that the LED is on for twice as long as it is off.
Why are there two delays? What happens if you remove one of the delays?
What happens if you start by turning the led off before turning it on?
Before continuing, it is useful to get into the habit of including documentation in the code. Comments can be included by prepending a line with a # symbol. Any text following that symbol, up until the end of the line, will not be viewed as an instruction. Excluding the import lines, add a comment before each line to describe what the code is doing.
4.1. Python Programming Activities#
Note
Below is an activity designed to introduce some python programming constructs. In the future, additional activities will be incorporated into this section.
4.1.1. Morse Code Interpreter#
In this suite of four projects, you will learn how to blink an LED using the digitalio interface, add timing delays to your code, assign variables, define functions, accept user input, manipulate character strings, and use other programmer’s code.
4.1.1.1. Introduction#
One of the challenges when programming with microcontrollers is the lack of a typical interface. We have grown accustomed to computers and computer-like devices having a screen of some sort that can transmit information in a textual or graphical format. A basic microcontroller does not have a display, and instead it must communicate with the user via the serial console - which requires access to another device that can read and display the serial console content - or other means such as light and sound. In this activity, you will use the red LED embedded on the M4 Express microcontroller to communicate with the end user.
Because it is relatively straightforward to control the state (on/off) and timing of an LED, it is possible to develop a Morse Code like communication strategy. Morse Code converts alphanumeric values into a series of dots and dashes. These dots and dashes can be converted into LED blinks of varying durations. Here are the timing rules for Morse code:
The length of a dot is one time unit
The length of a dash is 3 time units
The delay between characters in the same letter is one time unit
The delay between characters in the same word is three time units
The delay between words is seven time units.
There is no official definition for the time unit, so that value can be whatever is reasonable for your application.
Assignment submission Should this activity be used as an assignment, the following submission guidelines are recommended. Code for each of the four programs should be submitted with sufficient annotation of the code. At a minimum, each function and flow control loop should be preceded with a comment indicating its operation, global variables should be described upon first use/assignment, and the program should begin with a comment section indicating the intended purpose of the program and the program’s author.
In addition to annotated code, the submission should include a paragraph that comments on the following topics: describe the data domain conversions using Enke’s data domain map; can the Morse code generator be considered a signal transducer; identify one modification to the code that could make the final program more concise without compromising readability.
4.1.1.2. Program 1#
Create a sequence of LED flashes that corresponds to the letter A. Create a global variable that sets the unit of time to a value that is comprehensible to you. The loop should include a word-length delay (7 time units). This program can be completed using only the commands introduced in the example code shown above.
Optional Expansion Repeat the same process but for a chemical symbol of your choosing. A two-letter chemical symbol will require the inclusion of a letter-length delay
4.1.1.3. Program 2#
Modify the first program to replace the on/delay/off sequences with functions. See Chapter 3 of Automate the Boring Stuff or perform a web search on python functions for help on the structure of functions in Python. Functions should refer to a global variable that contains the standard unit of time (i.e. the duration of a dot). Create functions for dot and dash that do not require arguments and a space function that takes an argument indicating a same letter, same word or between word delay.
Note
One way to create the delay function is to make the argument the length of the delay. Then global variables such as letterdelay or worddelay with the appropriate amount of time.
4.1.1.4. Program 3#
Building on the functions from Program 2, allow the user to input a sequence of dots and dashes to the serial console and have that sequence displayed on the LED. Your solution should involve an if statement, and details can be found in Chapter 2 of Automate the Boring Stuff or a web search on python conditional statements. Your program should handle dots and dashes, treat spaces as letter delays and ignore all other characters.
Note
To accept user input from the serial console, use the input() function. A line such as inp = input(“what is your age? “) will prompt the user for her age and place the result in the variable inp.
4.1.1.5. Program 4#
Lastly, you are to incorporate another programmer’s code into your own. Refer to this Morse code translator example and copy the definition for the variable MORSE_CODE_DICT and the function encrypt into your program. Use the encrypt function to translate user input from alphanumeric text into Morse code. Display the encrypted text in the serial console and blink the code on the LED. This exercise introduces python dictionaries, which are covered in Chapter 5 of Automate the Boring Stuff or a web search on python dictionaries.
Optional Expansion Research the string method upper() and incorporate it into your program so that the user does not have to type her response in all capital letters.
4.1.1.6. Future#
Can you create a game that emits the Morse code for a chemical element?
Warning
See a problem? Have a suggestion? Please raise an issue and share your thoughts there.